Monday, July 27, 2009

Organize Your Stuff Challenge - Week 10

Welcome back, my die-hard organizers! Feeling better yet? I hope so! This week we're going to focus on ALPHAS - I'm talking stickers, Thickers, rub-ons, metal, chipboard, acrylic, you name it. If it's a letter, we're going to find a place for it this week.

What I've come across here is that there are really 2 different animals - there are stickers and rub ons, which are pretty uniform in size and stackability, and then 3-D letters (metals, chipboard, etc) which really have to be stored in a different manner. Because you're not going to be able to cram a can of KI Soup alphas in a filing cabinet with your Thickers. It just isn't going to work very well.

So let's see HOW to store the alphas first (both categories can work here). You can sort by color - which I find the easiest method for stickers/rub ons. You can sort by material type - which may be the way to go with the 3D alphas. You can sort by manufacturer. Or you can sort by letter for the 3D alphas. It's really up to you and the way you scrap. Systems can be mixed and matched as well - all my sticker and rub on alphas are stored by color, my "sets" of 3D alphas are stored by color, and the remaining 3D alphas are stored by letter. It works for me!

So WHERE to store your alphas? Let's tackle stickers/rub ons first. To me, any alpha set that is attached to a flat sheet is a sticker. So the Basic Grey chipboard sheets are stickers in my book - even though they are made of chipboard. If I can't easily remove them to store on their own, then it's a sticker. So here is my mega-list of links, please check them out and see if you can find a solution that will work for you and your space. Please note that the links I posted are intended to give you a visual idea of what it is I'm talking about - it doesn't mean I endorse the product or the store.

Clip-It-Up: http://www.clipitup.com/ They have the original, plus some new variations released at CHA. One of the best tips, tho - if you Google "homemade clip it up" you will find hundreds, if not thousands, of web pages from crafty scrapbookers who have devised their own systems, from spinning racks to wall-mounted rods. If you like things hanging from hooks, where you can see your entire stash, this is a great solution. You can also use rings instead of clip hooks, I love this solution: http://pinkpaislee.wordpress.com/2009/03/16/alphabet-storage/ and this one too: http://outtathisfunk.blogspot.com/2008/01/sticker-gripper.html
3-ring notebook or a Crop-In-Style Paper/Sticker Binder: http://store.scrapbook.com/psbbinblac.html
Vertical paper or magazine holders
On hooks in pegboard or slatwall
12x12 multi-drawer chests: http://www.stacksandstacks.com/iris-3-drawer-tabletop-plastic-chest/
Expandable files - great for crops!
Hanging file folders in a rolling cart or a file drawer
Stacked in a bin, basket or box - this works great for the "books" of alphas, like Making Memories rub ons
Cropper Hopper divided storage box: http://www.cropperhopper.com/dividedstoragebox-7x10.aspx

For 3D alphas, you need to figure out how you want to store your alphas - by color, set, letter, material. This will help you decide on what kind of storage you need and what size. Options include:

Zip top bags on clip it ups
Small jars in 3-drawer chests
Hardware cabinets: http://hand-tools.hardwarestore.com/70-420-storage-cabinets-small/storage-cabinet-603483.aspx?utm_source=nextag&utm_medium=cpc&utm_term=603483&utm_campaign=nextag
In bags in photo boxes
Tilt bins: http://www.amazon.com/gp/product/B000J07R8E
Floss organizers: http://www.amazon.com/Floss-Caddy-Compartment-7-x10-1-x1-1/dp/B000ZDME1A/ref=sr_1_3?ie=UTF8&s=home-garden&qid=1244335028&sr=1-3
IKEA Fira drawers: http://www.ikea.com/us/en/catalog/products/80073304
Muffin tins - this one is for buttons, but I've seen alphas organized by letter this way too: http://www.flickr.com/photos/wychbury/3193942747/
Spice jars or open bowls
Zip N Flip: http://store.scrapbooking-warehouse.com/278904.htm
Tackle box
Labeled envelopes - I've seen these glued to an address book by letter as well, but I think it could get bulky pretty fast

So now you know some options, here are the systems I found that worked for me.

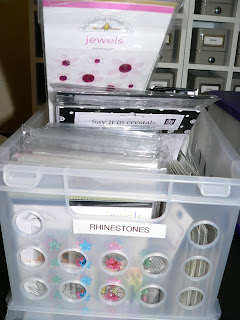
I have a serious addiction to letter stickers (to the point that I really should have an intervention). I have found a working solution tho - I have 2 file drawers dedicated to stickers and rub ons. These hold all my non-book style alphas - I have them behind plastic divider tabs, sorted by color:


For my multi-colored alphas (meaning there are multiple colors on the alphas themselves or on the sheets), I ran out of room in my file drawers (oops!) and started stacking them in nice baskets (purchased at Hobby Lobby) on my shelf:


I also keep any insanely-large monograms up on the shelf there as well.

For my booklets of rub ons (this does NOT include my AC Mini Marks, I think those are flat enough to go in my file drawers), I found this beautiful carved wooden planter in the garden section of Hobby Lobby in their summer clearance:


So those are my sticker/rub on solutions. For my 3D alphas, I sort first by set. If they come in a complete matching color and font set (like Chip Chatter or the Making Memories tiles), then I put the sets into zip top baggies (jewelry section of Hobby Lobby) and store the baggies by color in cheap photo boxes:


Each box holds one color, so I can grab it fast and not have to sort through it. These are also great kid-proof options - my baby loved teething on these bags! Then it got to the point where I'd come in the room and find 7-8 boxes opened, baggies everywhere - they're now taped shut with 2 short pieces of masking tape. He can't budge it, and I just need to remove one piece of tape to flip open the top.


Now, for my alphas that either aren't in sets (like most of the KI lines (with the exception of the Soups), which have the same font but the patterns don't match at all), or my naked chipboard, I divide those up by letter. I started with the hardware bin about 15 years ago, then moved on to the IKEA Fira drawers about 7 years ago, and in my new space have the Crop-In-Style type cubes (from Target). Simply because I needed the room!

Each alpha has it's own drawer. All types of materials are mixed in here.


I would advise against breaking up sets if you submit layouts for publishing a lot - unless you have a really good memory of what's what.


In closing, I want to add my 10 rules for organizing. I'm going to post these at the end of every challenge, because I think they are very, very important. I want you to keep them in mind as you tackle each of these projects - they will make your life easier and the task less daunting.
1. Label your containers.
2. Be consistent in your methods.
3. Don't be too specific - your search for your items within your space should be short and simple.
4. Your organizational method should be easy to take out AND put away.
5. When organizing, break any large piles into smaller groupings. Have a 2 foot tall stack of paper to sort? Do it in 1" high chunks, it will be easier to handle mentally.
6. If it's something that you use on almost every project, then keep it within reach of your main scrap area.
7. Don't stress your containers. Get a new system or purge your stash.
8. For most items, product packaging adds bulk. Toss it. One exception - rub ons.
9. Repurpose when you can - almost anything can be painted or covered in paper/fabric.
10. THE GOLDEN RULE - FIRST choose an organizational method, THEN choose a container that fits your space and style. Always shop for containers with a list in hand - a beautiful container is simply clutter if it doesn't have a dedicated purpose in your space!

Your alphas are now tidy and snug in their new little beds. Congratulations! Now go drool on your pretty organized Thickers (you know you want to) and meet me back here (sans drool) for Week 11.
Stacy

Monday, July 20, 2009

Organize Your Stuff Challenge - Week 9

I won't lie to you. This week is not going to be nearly as much fun as last week. It's going to be time consuming, involve a lot of curse words as tiny objects fall from your grasp for the thousandth time, and will require a lot of decisions. But it will be oh-so-worth-it in the end. We're talking embellishments this week. Get your Challenge hats on, this one will be a doozy.

I think the biggest issue with embellishments is that there are SO many - different colors, types, uses, you name it. It's nearly impossible to find one single solution that fits everything. Which means that in this case, it's ok to mix and match. What works for your Primas may not work for your buttons. They don't have to. As long as you know WHERE to get what you need, and HOW to get it, then all is good. That's what organization is all about - finding your supplies.

First off - HOW are you going to organize your embellishments? This depends on how you scrap - your main choices are by color or by type. When you're looking for an embellie, do you think "I need something red over here?" COLOR sorting may be the way to go - all your red embellies go in one bin, green in another, etc. If you're looking for an embellie and think "A button would look great in the corner," then sorting by TYPE may work best for you. Make a decision, and that will guide your storage options.

I think the best way to tackle storage is by giving you all a lot of storage options and then showing what I've come up with for each type of embellishment. I'll try to tackle it embellishment by embellishment, so if I leave something off, please let me know - I'll be more than happy to add it to the list. And if you have found a great solution, PLEASE post it - the more the merrier!! Keep in mind your stash as well - a few brads will easily fit in a tackle box. If you hoard, you'll need to move up to jars. As before, please note that the links I posted are intended to give you a visual idea of what it is I'm talking about - it doesn't mean I endorse the product or the store.

General storage for all kinds of little goodies:
Cropper Hopper Embellishment Boxes: http://www.scrapbook.com/gallery/image/scraproom/1226601.html
Glass or plastic jars in drawers: http://www.containerandpackaging.com/itemlist.asp?itemtype=Clear_Jars
Small ziptop baggies (look in the jewelry section of stores like Hobby Lobby)
Empty film cannisters
Spice jars on spice racks - revolving or magnetic/wall mounted
Multi-drawer chest
Photo storage box
Making Memories Embellishment Storage Box: http://www.kaboodle.com/reviews/making-memories--embellishment-storage-box--white You could also use a jewelry box!
Magpie tins - originally for Quikutz, but really are versatile: http://www.scrapbookexpress.com/qumaneti.html
Pegboard or slat wall with hanging bins

By Embellishment:

Brads: I have 3 systems for my brads.

First system: my general, run-of-the-mill brads are divided by color and shape into the multi-compartment containers from the Container Store. I keep them labeled and stacked in a drawer. If I need a brad, I use a pair of craft tweezers to get the one I want out:


Second system: my large brads go in large glass cannister jars. These are from the glass storage section at Hobby Lobby.

Finally - fancy brads are divided up by type (velvet, fabric, stripes, etc) into small plastic containers from Container and Packaging (link is above). The jars are thick clear plastic and are slightly shorter than 3" - which means they sit beautifully in the 3-drawer units from Sterilite! I used to house them in those drawers, I now have them in a single drawer in my scrap space:

Notice that I store them upside down - makes it easy to see what's in each container, no?

A unique idea I found, I've never seen this before! Very clever. http://creatingkeepsakesblog.com/2009/03/10/storage-solution-brad-boards/

Primas:

I know these little flowers give people fits! I think they'd be easy to store if they didn't come in such pretty packaging - you want to keep the jars, but it's hard to find anything in those mixes. My solution - first, sort by color. ALL the flowers. Then divide up by size within the colors - my larger flowers go into these beautiful glass cookie jars from Hobby Lobby:


My smaller flowers go into the original Prima jars, but this time - by color!

For packaged flowers - like Petaloo, or the fancy Prima flowers - I keep them in the original packaging, stacked on end in my drawer. Nothing special, but it works. You could easily do this in a pretty bin or basket as well.
For smaller stashes, a clip-it-up type system might work great: http://sarahs-scrap-book.blogspot.com/2008/05/blossom-and-ribbon-storage.html

Dew drops/Skittles: I keep these in their original containers as well. I found a pretty fabric-lined basket and just keep it in a drawer with my packaged flowers. It's easy to sort through the basket to find the right color.

Eyelets: Stored in the same Container Store boxes as my brads in a different drawer. Sorted by size first, then by shape and then by color.

Buttons:
I LOVE buttons. I love seeing them almost as much as using them! I think they add fun to a space. I have mine stored in glass cookie jars from Hobby Lobby, sorted by color:


For my fancier buttons (shaped, wooden, etc), I store them in the same small jars as my brads in a shallow drawer:


I have also seen them stored in shallow bowls or baskets, which is really cute. If you go to crops, re-using tins may be a good alternative: http://triplethescraps.blogspot.com/2009/03/organizational-friday-buttons-dew-drops.html

Rhinestones:
These are tricky, since some are stickers technically, some are not. I have my loose ones in the containers from the Container Store. I store that container - along with my packaged rhinestones - in a small milkcrate of sorts from Hobby Lobby. The crate goes on a shelf:

Miscellaneous STUFF:

All those little things that really don't fit into any categories. Wooden pieces, photo corners, metals, sequins, acrylic pieces, glass slides. I use the same small containers as the fancy buttons in the Sterilite drawers - but I removed those drawers from the main unit and stack them in my drawers instead.

Now, I just gave you a lot of information. A LOT. I don't want you to zone out on me here, and get overloaded. If you feel overwhelmed, go get your original list - your what works/what doesn't, and your brainstorming list. Now check those against the solutions I've offered here. You can probably immediately cross a ton of options off your list based on things you've tried before and didn't work, or your stash size, or because things that spin scare you. Go to crops a lot? Cross off any system that won't travel well.

In closing, I want to add my 10 rules for organizing. I'm going to post these at the end of every challenge, because I think they are very, very important. I want you to keep them in mind as you tackle each of these projects - they will make your life easier and the task less daunting.

1. Label your containers.
2. Be consistent in your methods.
3. Don't be too specific - your search for your items within your space should be short and simple.
4. Your organizational method should be easy to take out AND put away.
5. When organizing, break any large piles into smaller groupings. Have a 2 foot tall stack of paper to sort? Do it in 1" high chunks, it will be easier to handle mentally.
6. If it's something that you use on almost every project, then keep it within reach of your main scrap area.
7. Don't stress your containers. Get a new system or purge your stash.
8. For most items, product packaging adds bulk. Toss it. With once exception - rub ons.
9. Repurpose when you can - almost anything can be painted or covered in paper/fabric.
10. THE GOLDEN RULE - FIRST choose an organizational method, THEN choose a container that fits your space and style. Always shop for containers with a list in hand - a beautiful container is simply clutter if it doesn't have a dedicated purpose in your space!

Congratulations, you're no longer sucking up gallons of brads and eyelets every time you vacuum! Tell Mr. Duchovny it's time for your massage and we'll meet back here for Week 10 - it's alphabet time!

Stacy

Monday, July 13, 2009

Organize Your Stuff Challenge - Week 8

This week's Challenge is near and dear to my heart, because I wrestled with a solution for so many years and just recently found a great solution. I'm talking about projects, unfinished pages, and kits. We ALL have them - pages that need a little something but you don't know what, so it gets put aside. Monthly kits that come in and get stashed on top of a desk, only to be lost under piles. Projects that you intend to start, but can't find the rest of the supplies for so they just sit there. I have some suggestions that will hopefully work for you - they may or may not, so if anyone else has found a great working solution, post it as well!

My idea is a take-off of Stacy Julian's "Start Here" jar from Photo Freedom. What you will need (please note that the links I posted are intended to give you a visual idea of what it is I'm talking about - it doesn't mean I endorse the product or the store):

1. Some sort of enclosing system to hold 12x12 paper and elements. Some options include:
Zip lock bags: http://cgi.ebay.com/50-NEW-ZIP-LOCK-PLASTIC-BAGS-13-X-15-X-2MIL-ORGANIZE_W0QQcmdZViewItemQQ_trkparmsZ65Q3a12Q7c66Q3a2Q7c39Q3a1Q7c72Q3a1205Q7c240Q3a1318Q7c301Q3a1Q7c293Q3a1Q7c294Q3a50QQ_trksidZp3286Q2ec0Q2em14QQhashZitem588150e83cQQitemZ380126685244QQptZLHQ5fDefaultDomainQ5f0QQsalenotsupported
Craft Keepers: http://www.amazon.com/Craft-Keeper-12x12-Poly-Envelope/dp/B000BY4QD2
Snap-top Iris boxes: http://www.stacksandstacks.com/iris-storage-box-snap-case-snt/
3-drawer chests: http://www.stacksandstacks.com/sterilite-3-drawer-organizer-clearview-wide-20938003/?id=176&sku=11565&utm_medium=shoppingengine&utm_source=googlebase
Page protectors
Expandable files: http://www.shopwiki.com/_Cropper+Hopper+Expandable+Paper+Organizer-Clear
Planning folders: http://store.scrapbook.com/cmp-04972.html
Paper pouches: http://www.save-on-crafts.com/cropperhopper3.html

Note that some of the options are better suited for pages (ie, they won't hold bulky embellishments), while others will be better for projects or kits. I bought a 50 pk of bags off of Ebay for pretty cheap - they're 13x15", so they'll hold larger supplies, and they're thick enough not to tear. I don't need 50 bags right now, but I'm sure I'll find other uses for them, and they're cheaper in bulk than the large ziplocs you find at the grocery store. You can also split them with your friends, or use them for page kits. I use the Iris boxes for my larger projects (like baby albums) - I like that they stack and I can put a ton of stuff - including memorabilia - in them.

2. A way to store these enclosing systems. A bin, box, tiered skirt hangers, filing cabinet or upright holders (such as Cropper Hopper paper files) will work. If you're using page protectors, look into 3-ring binders. I went with the Cropper Hopper vertical paper holders. They hold the 13x15" ziploc bags beautifully.

3. Popsicle sticks. Raid your rub-on packs or your kid's art supplies.

4. A small can or jar to hold the sticks. I use a small wooden planter.

5. A black pen.

6. Your label maker (which should be permanently attached to your hip at this point).

How to do it: Place each one of your unfinished projects, layout, kits, etc in its own bag/container. Each bag gets a label - start with #1 and move up. You can label larger projects individually (ie, Baby Album). At the end, everything should be in a matching container so you can pull one out with ease. Place all these containers in numerical order in the larger bin or basket. So for my system, I have my ziploc bags labeled and stashed in the Cropper Hopper vertical files. I also use the Iris cases for my larger projects:


Grab your popsicle sticks. For each number on your bag, put the same number on your popsicle stick. This goes for your projects as well. So you should have a "1" popsicle stick, "2", etc and one labeled "Baby Album" (for example). Use as many sticks as you have bags/projects. Here are my sticks, feel free to dress them up:

Once you have all your sticks labeled, put them in your jar:

Ok, great! So now you have a jar full of popsicle sticks and you're probably thinking I'm nuts. Well, a little, but that's ok. This jar is going to be your little scrap angel who gets you moving in the right direction when you don't know where to begin. You know those moments - when you have 2 hours of freedom, you walk into your CLEAN scrap space, and think "OMG where do I start?" and log on to 2Peas instead and kill your 2 hours dead. You will not be doing that anymore. Instead, you're going to pull out a stick - randomly. Say your stick says "#6." Go to your bins and grab bag #6. It may be the kit you got in the mail yesterday - go find some pics and create a layout with it. It may be the page you set aside last August - finish that baby up! Work each project as long as you have time, and then re-file it when it's done - or keep on working if you have the mojo. Once the file is cleared out, recycle that bag for the next project or finished page. Or if you get stuck again, just re-file it - you'll come back to it next time you choose that stick. And you don't HAVE to use the sticks everytime - your system is now organized enough that you can flip through everything you have in-progress and choose a project that matches your mood. Isn't organization wonderful? Aaaahhh.

I want to quickly share one neat tip I found to keep track of your kits - take a picture of each one with all the contents spread out. You can then keep this with the kit itself (so you don't have to search through the whole kit), or in a separate notebook. And if you want to keep track of everything that you have page-wise, here's a very cool download I found from Becky Higgins. It will help you keep track of what's missing what.

http://www.creatingkeepsakes.com/articles/Download_Sbk_Pgs_ToDo

In closing, I want to add my 10 rules for organizing. I'm going to post these at the end of every challenge, because I think they are very, very important. I want you to keep them in mind as you tackle each of these projects - they will make your life easier and the task less daunting.

1. Label your containers.
2. Be consistent in your methods.
3. Don't be too specific - your search for your items within your space should be short and simple.
4. Your organizational method should be easy to take out AND put away.
5. When organizing, break any large piles into smaller groupings. Have a 2 foot tall stack of paper to sort? Do it in 1" high chunks, it will be easier to handle mentally.
6. If it's something that you use on almost every project, then keep it within reach of your main scrap area.
7. Don't stress your containers. Get a new system or purge your stash.
8. For most items, product packaging adds bulk. Toss it. With once exception - rub ons.
9. Repurpose when you can - almost anything can be painted or covered in paper/fabric.
10. THE GOLDEN RULE - FIRST choose an organizational method, THEN choose a container that fits your space and style. Always shop for containers with a list in hand - a beautiful container is simply clutter if it doesn't have a dedicated purpose in your space!

Congratulations, your piles of projects, kits and pages have now been tamed! Raaar! Go relax with a latte and I'll see you back here for Week 9 - be ready ladies, we're going to get those embellishments in order!

Stacy

Monday, July 6, 2009

Organize Your Stuff Challenge - Week 7

Welcome to Week 7! Wow, you guys have come so far, thanks for sticking it out with me. Hopefully you're starting to see some progress by now and you might even be able to see a glimpse of your scrap table! This week we're going to focus on one of my favorite topics - IDEAS! I love this topic because it took me years and years to find a system that works, but I finally did get organized and it's made me very happy. Not calorie-free cheesecake kind of happy, but still happy.

Thankfully, there are really only 2 sources where we can get layout ideas - print and digital. You can go all print, all digital, or a mix of both. It really depends on how you scrap - do you have access to a computer when you're scrapping? If not, you may want everything in print. But if you have more room on your hard drive than in your scrap space, or if most of your inspiration comes from online sources, then digital may be the way to go.

First off - HOW to organize your ideas. I found the best way to do this is by theme. This will work for both print and digital. What exactly do you pull out for ideas? Let that be your guide. Some possibilities include titles, journaling, photography, layouts (theme or by number of photos), quotes, tips and tricks, techniques, color, designs, basics/accents, borders, card ideas and mats. You can have any number of categories that work for you - as long as you'll know where to go for that idea. You know best how your mind works. One caveat - do NOT have a "misc" category. It's a catch-all and really useless - you'll never reference it!

Second - now that you know how to divide up your stack, let's talk storage options. If you go digital, well, you're set! Print has a lot more options. Here are some solutions I've found (please note that the links I posted are intended to give you a visual idea of what it is I'm talking about - it doesn't mean I endorse the product or the store):

Put ideas in 3-ring binders, with or without page protectors, divided by category
On note cards in a Cropper Hopper photo case: http://store.scrapbooking-warehouse.com/272764.html
Upright in magazine holders (if you decide to keep the magazines)
On notecards in photo storage boxes or note card files: http://www.thegreathardwarestore.com/ProductDetails.asp?ProductCode=294272&click=2744
In a mini photo album
Tacked up on a large corkboard/"inspiration board"

Choose the best method that will not only fit your space, but also the way you tend to look for ideas.

Now, the dreaded topic of magazines. I think there are 3 camps of scrappers here. Those who tear out ideas and toss the magazines. Those who either flag the articles in the magazines or are so into them they know every article and idea. And those who keep the mags because of hoarding issues, haven't looked at them in 5 years, but are petrified to toss them. I used to be #3 until I realized that my bookcase full of magazines could be holding scrap supplies instead. That gave me enough incentive to go through them and only keep what I needed. Because seriously - have you checked out the September 1991 issue of Creating Keepsakes? Will you REALLY reference anything in that magazine? I hope not! If you do decide to keep the magazines, one option to organize them is with colored sticky notes. You could assign one color per topic and flag the layouts or articles appropriately. That way, you have the best of both worlds - keep your mags and still have your ideas organized! Most magazines also offer a yearly reference, you could use those as a guide instead of using a tagging system. Personally, I prefer tearing out ideas - I found it was much easier to flip through an idea book essentially tailor-made for me, rather than several magazines that had a handful of what I was looking for. It's saved me a lot of time over the years, even though the setup was fairly time consuming (I had a backlog of 10 years of magazines to go through!) But once it was up and running, it was great. Whatever you decide is up to you. Just keep in mind - whatever you choose to keep in your space is less room you'll have for other supplies.

What about idea books? One nice thing about books is they don't HAVE to be in your scrap space. You can store them just about anywhere. But what about the ideas inside? With books, you can leave them as is, you can flag them, or you can scan them. I chose to get rid of a large number of my idea books and only keep the ones that are specific to a topic or a technique now. For the remainder, I went through them and scanned any layout ideas I liked. I then edited the scans to fit a 4x6 note card and printed them out. They are filed with the rest of my ideas. It took a little time, but was easy to do - and even better, it's made me VERY selective about the books I buy now, because I don't want to scan more!

My system has 3 parts - layout ideas, general ideas and cards. General ideas and cards have their own 3-ring binders. I use scrap paper and notebook paper to glue my cutout ideas on. Just a quick 3-hole punch and they're off into their respective categories!
My card idea binder has no categories, just ideas.
My idea binder is separated by dividers - once again, just quickly glued in on scrap paper:
Now, for my layout ideas - I LOVE scraplifting. Not so much for the ideas as for image placement - I have such a hard time getting the pics to look "balanced" on a page. So all the layouts I love because of the design are in my Cropper Hopper photo case. It contains 4x6 notecards of all my favorite layouts, divided up by number of photos in a layout. They are in all sizes and orientations - when I go to my idea file, it's because I have a certain number of photos I want to scrap and need ideas on how to lay them out. Size doesn't matter! So, in getting these ideas TO the file, I take these steps. If it's a print idea, I cut it out and paste it to a 4x6 notecard. If the print idea happens to have a sketch as well, the sketch goes on the front and the image of the layout goes on the back. I put the number of photos in the layout in the upper right hand corner so I can re-file it quickly. I also LOVE the 4x6 size, as it's the size of most of my photos - which means if I come across an idea which would be perfect for a set of photos but I'm not ready to scrap them yet, I can stick the card in with the photos - easy solution! If I find ideas online I like, then I save it to my "to print" folder. I use Photoshop Elements to cut and paste the idea onto a 4x6 page and re-save it, deleting the original. When Walgreens has their $0.10 print sale, I do a batch upload and file the pictures when I receive them. If the print image is too large to put on a notecard, I scan it and then edit it to fit on a 4x6 notecard using Elements and save it with my digital images.

Another solution I found - quotes and YOUR layout ideas. My kids are always saying funny/weird things that I want to document. I'm also always getting ideas for layouts - and of course, nothing to write them down on! I found these wonderful spiral bound index cards:
http://www.officemax.com/catalog/sku.jsp?productId=ARS26044&history=wq1xr84dprodPage~15^freeText~note+cards^paramValue~true^refine~1^region~1^param~return_skus@4q55w63cprodPage~15^paramValue~true^refine~1^region~1^categoryName~Cards+%26+Card+Filing^param~return_skus^categoryId~cat270002^return_skus~Y^parentCategoryID~cat_10003
Almost any office supply store has them, in various sizes and colors. I bought about 5 of them - for the rooms my kids play in the most, my car, my purse, and in my nightstand (SO many layout ideas happen as I'm falling asleep!). So once you write something down, the card easily tears out of the pack and the rest stay together - and you can file your quotes in a card file (you can assign different family members different colors if you get the colored cards), and file your layout ideas with your actual photos. This has been a great help to me!

Keeping up with the system - now that's a different animal completely! First off, I have a central location where all my ideas go. Well, 2 actually - one for print, one for digital. On my computer, I have a "to print" folder. If I find any ideas online, they get saved to that folder. If I find print ideas in magazines or the like, I tear them out and put them in a hanging file on my wall labeled "ideas." So the ideas now have a home, at least - which is better than piled up on my dining room table. What I have discovered that works for me is to put my idea filing in my datebook. Just like with photo backup - if it's on my to-do list, it'll get done. For me, I chose the 20th of the month. On that day, I scan in my "too big" print ideas and edit them to 4x6s. Once I get these prints back after uploading on print sale day (usually the next day or so), I label and file all my new images, and cut/paste or hole-punch the ones in my wall file. Within 2-3 days, everything is in its place and I'm ready for a new batch.

In closing, I want to add my 10 rules for organizing. I'm going to post these at the end of every challenge, because I think they are very, very important. I want you to keep them in mind as you tackle each of these projects - they will make your life easier and the task less daunting.

1. Label your containers.
2. Be consistent in your methods.
3. Don't be too specific - your search for your items within your space should be short and simple.
4. Your organizational method should be easy to take out AND put away.
5. When organizing, break any large piles into smaller groupings. Have a 2 foot tall stack of paper to sort? Do it in 1" high chunks, it will be easier to handle mentally.
6. If it's something that you use on almost every project, then keep it within reach of your main scrap area.
7. Don't stress your containers. Get a new system or purge your stash.
8. For most items, product packaging adds bulk. Toss it. With once exception - rub ons.
9. Repurpose when you can - almost anything can be painted or covered in paper/fabric.
10. THE GOLDEN RULE - FIRST choose an organizational method, THEN choose a container that fits your space and style. Always shop for containers with a list in hand - a beautiful container is simply clutter if it doesn't have a dedicated purpose in your space!

Congratulations, your ideas are now all neat and orderly! Go get yourself a well-deserved foot massage and I'll see you back here when we tackle projects, incomplete pages and kits - I'll share another recent discovery of mine, I think you'll love it!

Stacy